Divi/Bloom-Sendy Integration Addon
WHAT IS DIVI/BLOOM?
Divi isn’t just a WordPress theme, it’s a complete design framework that allows you to design and customize every part of your website from the ground up. You have control over everything down to the finest detail. Create the perfect websites for you and your clients.
Bloom is an email opt-in plugin that was built to help you grow your email list. Bloom works by adding email opt-in forms to your website, each of which can connect to your email marketing or email newsletter software. When someone signs up using the Bloom opt-in form, they get added to your email list. Bloom works with tons of different email marketing software, and allowing you to create different types of opt-in forms that appear on different areas of your website and in different forms (such as pop-ups, fly-ins, or normal inline forms).
WHAT IS SENDY?
Sendy is a self hosted email newsletter application that lets you send trackable emails via Amazon Simple Email Service (SES). This makes it possible for you to send authenticated bulk emails at an insanely low price without sacrificing deliverability.
WHAT’S NEW
Version 1.3.4
- Fix compatibility issues with Divi 4.1.
FEATURES
- Seamless integration between Bloom and Sendy.
- Supports Bloom/Divi Custom Fields.
- Supports for EU GDPR compliance.
- Captures IP address, and referrer url.
- Support Divi Email Optin Module.
- Easy installation with virtually no setup.
- Super easy to use.
- Support multiple Sendy installations. Each optin can connect to different Sendy system if needed.
REQUIREMENTS
- WordPress
- ElegantTheme Bloom plugin
- Sendy
GETTING STARTED
INSTALLATION
There are two options to install a WordPress plugin. Choose one of the options below.
OPTION 1: INSTALL VIA FTP
- Unzip the package
av-bloom-sendy-premium.zipon you computer. - Upload the extracted folder the
/wp-content/plugins/directory.
OPTION 2: INSTALL VIA THE PLUGIN MENU
- Go to
Plugins > Add Newmenu, then click theUpload Pluginbutton at the top. - Upload the
av-bloom-sendy-premium.zipfile.
INSTALLING PLUGIN UPDATES
Starting version 1.3.0, when an update is available you will receive notice in your WordPress dashboard. Just click on the update link.
ACTIVATE THE PLUGIN
- Go to
Admin > Plugins > Installed Plugins - Click the
Activatelink on the Bloom- Sendy Integration Addonplugin.
- Enter your license key in the license box.
CONNECT TO SENDY
Connecting Bloom to your Sendy email list is very easy. Just follow this step-by-step guide:
STEP 1: CREATE NEW EMAIL LIST ACCOUNT
In the Admin dashboard, go to the Bloom option page, and select the Email Accounts tab. 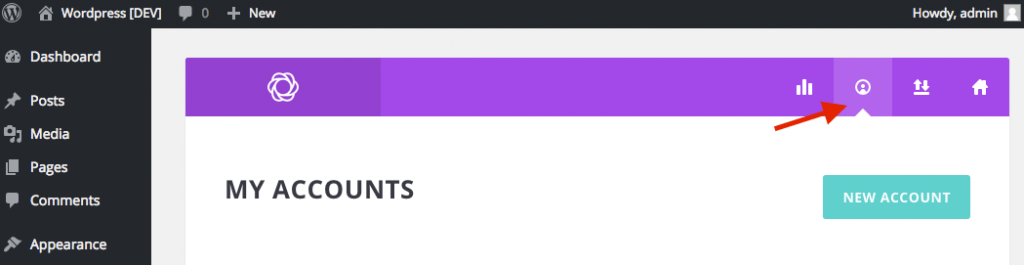
STEP 2: SELECT EMAIL PROVIDER
From 'Select Email Provider' drop down menu, choose Sendy. Bloom will then load fields required to connect Bloom to Sendy. 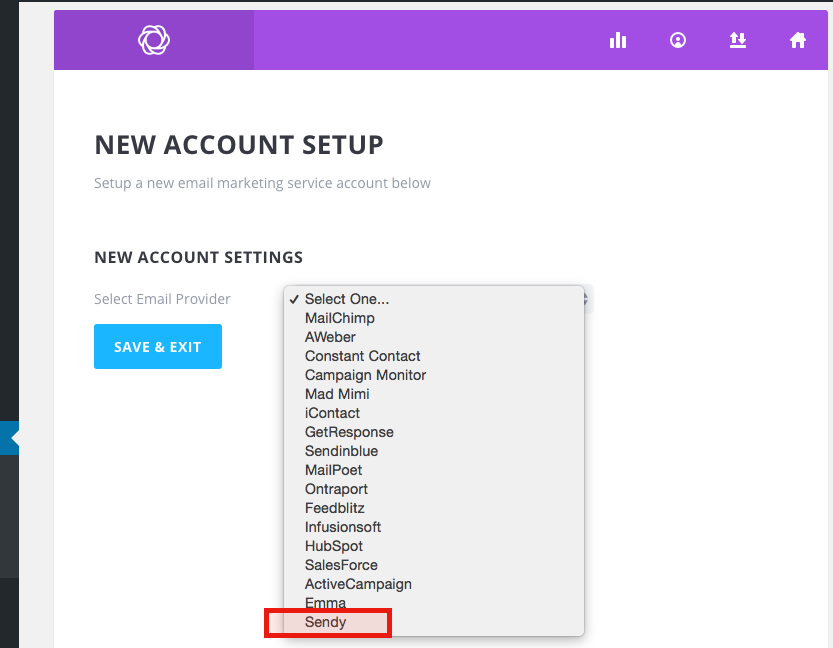
STEP 3: GET YOUR SENDY API KEY
Go to your Sendy installation and go into your account Settings. There you can find your api key. 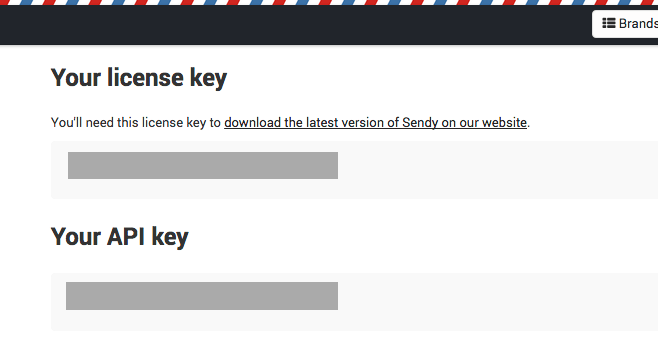
STEP 4: FILL IN THE REQUIRED INFORMATION
Enter the required information into the corresponding fields. You will need to enter the account name, the URL of your Sendy installation, the api key (from Step 3), and the hash-id of the Sendy list you want to connect. Then click the 'Authorize' button. 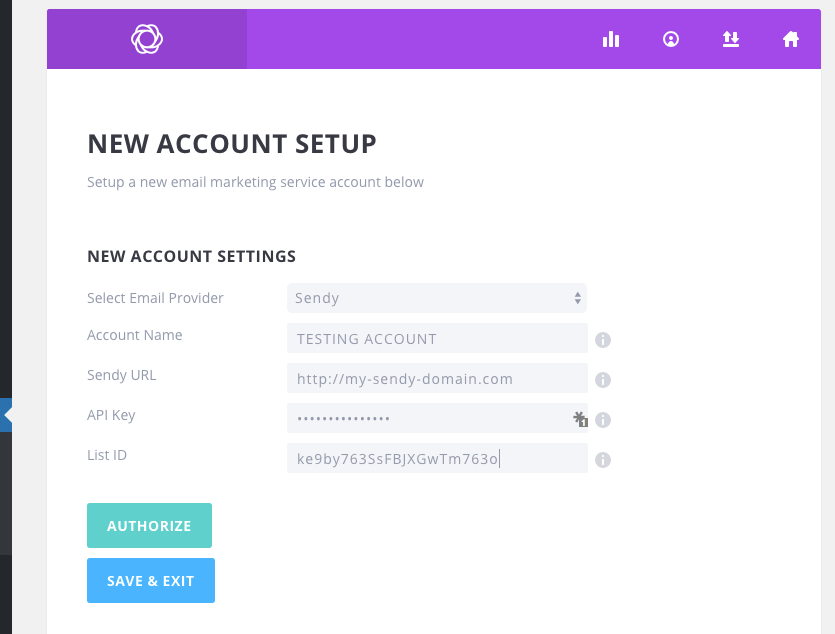
STEP 5: YOU SHOULD NOW SEE YOUR SENDY LIST
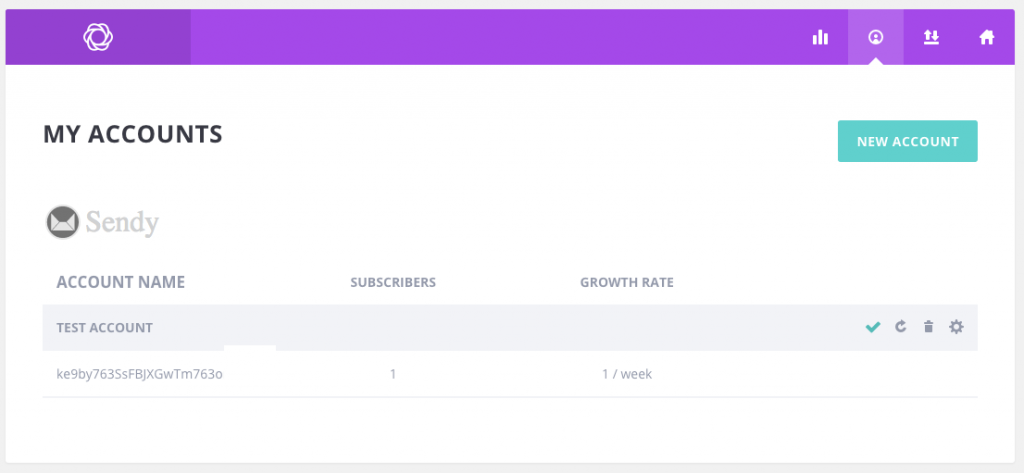 Congratulations, you have now integrated Bloom with Sendy. For further help in creating your Bloom optins, you can go to the ElegantThemes’ Bloom documentation page.
How To Setup GDPR Custom Field
To capture user’s consent for GDPR, you need to add a custom field (with special ID: gdpr) to your optin form. Follow these steps:
- Add a Checkbox custom field to your Bloom optin form. See this page on how to manually add a custom field.
- Set the custom field ID to:
gdpr - Set the other parameters of the custom field as appropriate.
How To Setup Other Custom Fields
If you need to capture custom fields in your optin form, you need to add custom fields to the optin forms with the same ID as defined in your Sendy list. Follow these steps:
- Create the custom fields in your Sendy list.
- Add Bloom custom fields in your optin. Set the ID of the custom field the same as you have set in Sendy.
- Set the other parameters of the custom fields as appropriate.
Change Log
VERSION 1.3.4
- Fix compatibility issue with Divi 4.1
VERSION 1.3.3
- Fix compatibility issue with Sendy 4.0.3.3
VERSION 1.3.0
- Add support for Bloom Custom Fields.
- Add support for Sendy
gdprfield to help with EU GDPR compliance. - Add support for capturing
referrerfield - Add support for capturing IP address.
VERSION 1.2.2
- Add support for Divi Email Optin Module
VERSION 1.2.1
- Fix issue with Bloom 1.2.18+
VERSION 1.2.0
- Fix compatibility with Bloom version 1.2.x
- Bloom-Sendy Integration addon version 1.2.x requires Bloom version 1.2.x to be installed in your system. If you have earlier version of the Bloom plugin, you can still use version 1.0.0 of the Sendy integration addon.
VERSION 1.0.0
- Initial release.
PURCHASE
SPECIFICATIONS
VERSION: 1.3.4
REQUIREMENTS: WordPress, Bloom or Divi (4.1+), Sendy